Today marks the last craft fair of the year for me. This autumn I participated in 5 events and I am gradually learning more about the demographics that seem to like my jewelry.
I have really enjoyed these events, meeting people, and learning more about the handmade marketplace out there in my local community.
It's given me an opportunity to support my habit so that I can continue my addiction into next year!
So, thank you to all my customers, friends and supporters!

Sunday, December 8, 2013
Thursday, November 14, 2013
Etching!
Never someone to stick with just one thing, I've been playing with some glass etching, of course on wine glasses, because, after all, why would you not want a witty wine glass to accompany your general quaffing?
Anyway, it started with this -

Then, Alpine were having a wine tasting night - so these were a perfect donation to go in a wine basket!

Here are my 2 latest ones...

 Cute huh? Make a fun gift for a little cost. And you can't get them from Target so you know the person won't get two....
Anyway, it started with this -

Then, Alpine were having a wine tasting night - so these were a perfect donation to go in a wine basket!

Here are my 2 latest ones...


Thursday, September 19, 2013
Busy Busy!
I've been super busy lately, both trying to expand the marketing of my Etsy store, but also making some stock ready for the fall 'Craft Fair Season'.
Here are a few of the newest pieces!


Really loving how they all turned out! It's fun to pick up new glass and play!
Here are a few of the newest pieces!


Really loving how they all turned out! It's fun to pick up new glass and play!
Friday, August 30, 2013
Backing Cards (yes... again!)

But, I needed something to make them recognizable as mine. Cue my brand new stamp, courtesy of Salt Marketplace in Utah, on Etsy.
For the bargain price of $10 + shipping, I have my own little stamp that's the right size for my cards and now gives them a little 'something something'.
It's perfect! Highly recommend these guys, super quick and helpful.
Wednesday, August 21, 2013
Custom Order With Special Meaning..

The friend had a tattoo with 3 stars and they used 2 colours of ribbon to represent awareness of his condition.
I love how it turned out and hope the family love it too.
Wednesday, July 24, 2013
Chain-mailling!
 |
| Rings! |
I love the idea of combining chainmaille and fused glass and thought I would give it a go. As luck would have it, we appear to have one of the best ring supply stores right here in town! C&T Designs also happen to be right down the road from where my son has a therapy appt too, so I popped in earlier this week.
Tonight, I managed to sit down and actually play for a few minutes and voila! I actually managed to recreate the pattern I like, which is an original pattern created by Curt at C&T, Acute Helm.
 |
| A couple of links in... |
So, what do you think?! I'm pretty impressed with myself for a first attempt!
 |
| Longer chain! |
Sunday, July 14, 2013
Making Pendants with Mum!
 |
| My mum's lovely work! |
 |
| Mum and my little helper! |
Sunday, July 7, 2013
Backing Cards!
 |
| New card ideas! |
 |
| Card in cabinet! |
I will need to work on size, but, I think they look pretty cool!

Tuesday, June 25, 2013
Craft Show Display
Up until now, I've been using little tented cards for craft shows, where I wire on the pendants. That is, until now. Look what I just found at our local TJ Maxx?!
My friend and I did a craft fair recently and there was a stall set up that was so creative and amazing we were fawning over it. This is very similar to what this lady had, except, I think she'd created her own. Since it was on clearance, I figured I would just get this - I don't think you could even get the materials for what I paid.
It's perfect!
 |
| Perfect little display unit! |
It's perfect!
Tuesday, May 28, 2013
More Photography!
I'm gradually learning better techniques for taking pictures of my items and I'm trying to listen (and retain!) when someone suggests something.
So, using a piece of leftover granite from our recent house build, I decided to switch up the background, since I'd previously been using a wood piece.
Anyway, so, here are a few of my original pics with the new improved, taken in natural light, versions alongside.. I also added in an additional photo in Etsy with a reference item, a suggestion from a friend of mine and I think it was a good one!
 |
| Blue bubble pendant (old - left, new - right) |
 |
| Gold leaf pendant (old - left, new - right) |
Also, here's a tip for anyone out there looking for background options for
small item pictures - home improvement stores sometimes have free
samples of hardwood and laminate flooring. They're great for this!
Sunday, May 19, 2013
Pendant Developments...
As everyone has seen, I've been making some pendants using an etching technique and have been somewhat limited by the availability of suitably small craft punch shapes I can use to mask off the glass from the etching cream. So, I decided to treat myself!
I just ordered this little beauty!
It's a Silhouette Portrait and I got a great deal on Overstock. They even gave me a $15 credit because apparently coupons don't work on 'electronic' items. Nice, huh?
So, what does this do? Well, it's similar to a Cricut, but, instead of only cutting the images on a cartridge (which are pricey) and inevitably have a ton of images on them I don't want, this little one enables me to design my own and also use logos, which could open up a whole heap of opportunities! Instead of cartridges, Silhouette has an online store from which you can download images in smaller quantities for much less money. Perfect.
In other news, my little room floor is now epoxied and I can now start putting some actual furniture in there. Woohoo!
Tuesday, May 14, 2013
Bones!
We've just moved to a new house and it's pretty exciting for a few reasons. We're hoping that it will be our last move for a while and since we did a custom build, I was able to add a little 'playroom', just for me!
Anyway, here's a pic!
 Obviously there's a lot of work to be done on it before it can be productive! Next on the list are epoxying the floor (don't want any flooring in a glass room!) and replacing the baseboards.
After that, I'll start adding in some shelving and workbench space.
Now I just need to finish unpacking the rest of the boxes...
Anyway, here's a pic!

After that, I'll start adding in some shelving and workbench space.
Now I just need to finish unpacking the rest of the boxes...
Thursday, April 25, 2013
Photography!
 |
| Trimmed image |
I am not much of a photographer. There, I said it. I am one of those people that can read the 'technical' details of how to take photos, but for some reason I always forget them and unless I have the instructions right next to me, I just won't be able to execute.
I do have a great camera though, a Canon Rebel T2i. It takes lovely pictures and I know it's capable of far more than I use it for.
Since I've launched the Etsy store, I'm on the lookout for tips to take great pictures without having to remember the technical stuff. I found this article on Handmadeology and it explains, with pictures (always good) how to take better, 'studio quality' pictures of items you want to sell on Etsy or other online sites.
So, I figured I would give it a go!
Here is my pic, untrimmed. I had to improvise and use one of my 6 yr old's games as a reflector and learned my items need to be propped up a little. I used a cabochon that hasn't yet had a bail attached to it.
 |
| Cabochon - lit with 'tin' foil |
Tuesday, April 16, 2013
New Baby!
 |
| New kiln! |
Well, not literally, but kind of.
Last weekend I drove up to Denver to pick up a used kiln I found on Craigslist - a lady was selling her glass art supplies. I decided to buy it and got it for about half the price of a new one. The kiln was in excellent condition, as the lady had only purchased it to do test-firing, unlike me, who will use it to actually make stock. It's a little kiln, but for the volume I produce it'll be great! Another bonus is that it's the exact same model I currently use at the glass shop in town, so I already know how to work it!
There is always the concern when buying off Craigslist, or any kind of used kiln, that it's been overfired and won't work, but that doesn't seem to be a problem here - yay!
She also gave me a tub of kiln wash, which has worked a treat so far, and some spare glass she had, which is always nice, since glass is expensive!
 |
| Loaded up with a few things to fire! |
Tuesday, April 9, 2013
Kiln!
Currently I pay to fire my glass pieces at a local glass store, but one of my aims is to buy my own kiln, especially when we move to the new house which has my own little studio built in...
I've just got a lead on a used kiln that might just be perfect. It's the same kind as the one I pay to use and it's only an hour away. A trip to Denver might just be on the cards this weekend!
Also coming up this week is a Friday night Spring Carnival at a local elementary school, that my friend Laura and I are going to team up for. Let's hope it actually feels like spring, since today it's snowing and is below zero. Brr.
Friday, March 29, 2013
Sarah's Little Elf!
 |
| Pieces ready for firing! |
I was prepping a few new pieces for firing the other day and had a new offer of help. Great, right?!
The offer was from my (barely) 6 yr old, who insisted he wanted to help 'do glass'.
So, I figured, I might as well give him something to feel good about for the day and allowed him to score the glass I'd lined up on my strip cutter. And he did a lovely job. Although now wants to 'help' all the time....
Monday, March 25, 2013
More Etsy-ing
I've been continuing to list my pendants on my Etsy store (the link to it should be on the right side of the page!) and at the same time have been browsing around the site.
It really has become somewhat of an obsession now. There are some really creative people on the site.
Here are a couple of today's finds -
 Well, yes, I'll admit it, I am a total geek, but I LOVE this! Ha ha ha. I would be chuckling away.. Especially since I live in the city of the Left Lane Lollygagger, aka Colorado Springs. This one is from Rage Paints. Awesome.
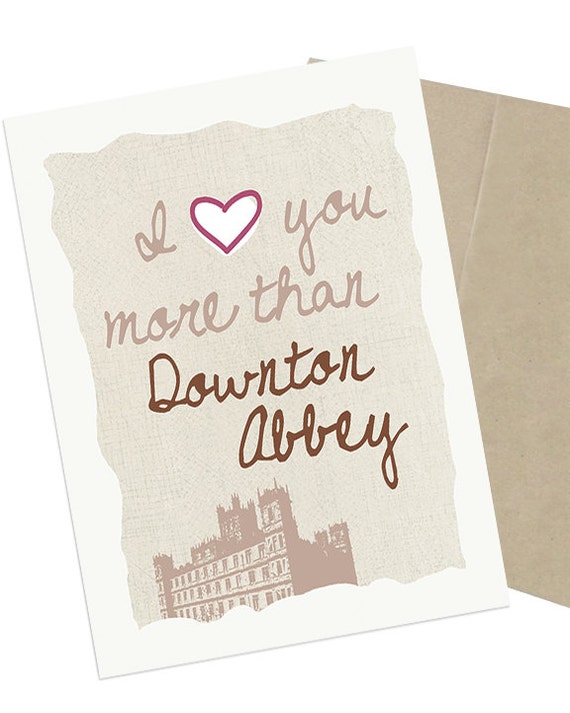 And since I am a huge Downton Abbey fan (and no - it's not pronounced "Downtown"), here is another cute little Downton item that I am never likely to send, since, a) the hubby and I don't send Valentines and b) that would be a tough thing to admit. Some days at least. That one's from UUPP.
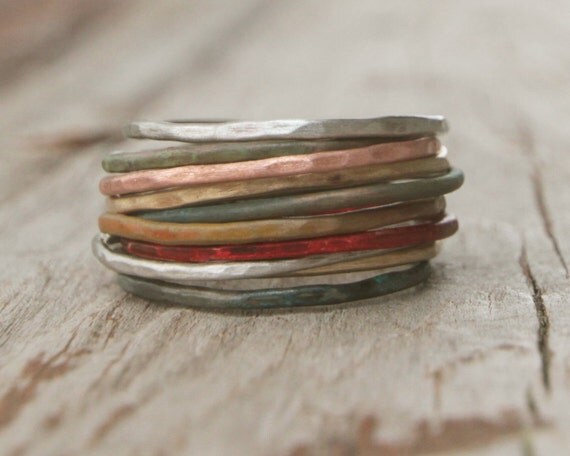
And finally, for something a little more serious, I love these rings. Aren't they pretty? These are from Amy Waltz.
It really has become somewhat of an obsession now. There are some really creative people on the site.
Here are a couple of today's finds -
And finally, for something a little more serious, I love these rings. Aren't they pretty? These are from Amy Waltz.
Sunday, March 24, 2013
Etsy-ing
Is there such a word? Anyway, in order to streamline my checkout and sales, I'm adding all my listings to my Etsy Store. Gradually of course. That way, people have an easier time of ordering without messaging, if that's what they prefer. Of course, I don't mind if anyone wants to just message me on Facebook to order anything, but, I think it's good to give a choice!
Since I'm very new to the whole Etsy experience, I'm trying to keep up with the VERY steep learning curve that is the Etsy world.
I found this article online and it seems very thorough, so I've decided to take a few pointers and see where it leads.
Of course, whilst browsing around Etsy, I found some really cool things. Must not buy. Must not buy. At least yet. But, here are a few of my finds -
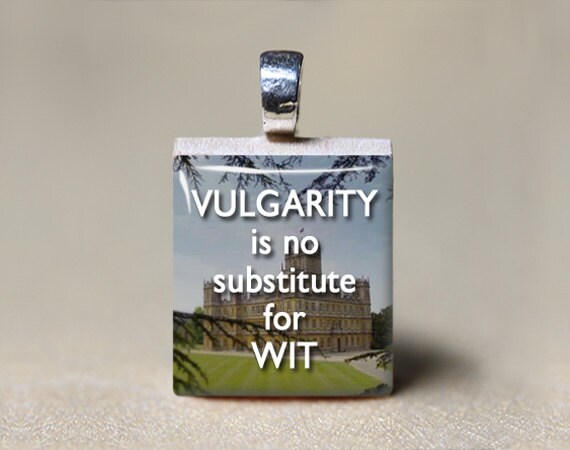
This one is from a store called "Mod Jules". There are a bunch that gave me a chuckle whilst browsing, but Jules' selection of Downton Abbey ones are pretty cool.
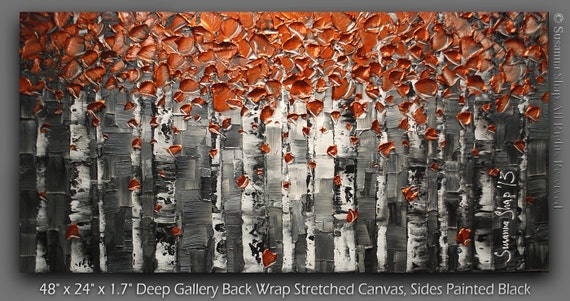
Here's another. Wow is all I can say. Beautiful. Who knows, one day I might be able to afford it, but in the meantime, I sure can admire. This one is from "ModernHouseArt".
So, hopefully at some point, Etsy will generate some sales and I can buy new shoes, or scrabble pendants, or fantastic original art.
And, if anyone out there has any great advice for selling through Etsy, please feel free to share your secrets!
Since I'm very new to the whole Etsy experience, I'm trying to keep up with the VERY steep learning curve that is the Etsy world.
I found this article online and it seems very thorough, so I've decided to take a few pointers and see where it leads.
Of course, whilst browsing around Etsy, I found some really cool things. Must not buy. Must not buy. At least yet. But, here are a few of my finds -
This one is from a store called "Mod Jules". There are a bunch that gave me a chuckle whilst browsing, but Jules' selection of Downton Abbey ones are pretty cool.
Here's another. Wow is all I can say. Beautiful. Who knows, one day I might be able to afford it, but in the meantime, I sure can admire. This one is from "ModernHouseArt".
So, hopefully at some point, Etsy will generate some sales and I can buy new shoes, or scrabble pendants, or fantastic original art.
And, if anyone out there has any great advice for selling through Etsy, please feel free to share your secrets!
Ways To Purchase!
Dragon Glass pendants make great gifts. They are great for teacher and therapist end-of-year and holiday presents, but would also be wonderful for bridesmaid souvenirs and birthday gifts.
If you see anything you like on here there are a bunch of ways to purchase.
1 -You can can email me at dragonglassusa@gmail.com and let me know what you like.
2 - You can contact me via the Facebook page - www.facebook.com/dragonglassusa. Comment on the picture you like and message me!
3 - You can use my Etsy store - https://www.etsy.com/shop/DragonGlassUSA.
I can also create custom items. If you want a particular colour combination, size, quantity, let me know!
Ways to Pay -
I can take cash and credit cards locally. I can accept PayPal from a distance. I can also create an Etsy listing if you prefer to use Etsy for your transaction.
Shipping -
I can ship jewelry items out (right now only US + Military Overseas)! I can send via a bubble mailer using first class USPS for around $3. Priority mailing is just over $5. If you want multiple items, it usually doesn't change the shipping cost and for priority, the charge is the same $5.15 or so for as many items as can fit in the box (which is quite a lot!). So if you want more than 3 or so items, priority mail is probably the way to go!
Sunday, March 17, 2013
Firey Pendant!

I love the way this pendant turned out. I made two (of course they're slightly different because it's almost impossible to make identical ones - part of the beauty of fused glass) and I love them both. Having to try very hard to not keep one for myself....
Monday, March 4, 2013
More New Pendants!
My friend Laura and I have joined another local craft fair to replace the autism event we were doing.
It's the Cordera Craft Fair and is just up the road from us! Perfect!
Come and join us if you're in the area, at the Cordera Community Center at 10am on March 23rd.
In light of this, I figured I would make some additional stock in preparation!
Here are a few of them, as always, the rest are, or are in the process of being, added to the FB page!
 Update 3/9/2013 -Top middle, bottom left and bottom middle all sold.
It's the Cordera Craft Fair and is just up the road from us! Perfect!
Come and join us if you're in the area, at the Cordera Community Center at 10am on March 23rd.
In light of this, I figured I would make some additional stock in preparation!
Here are a few of them, as always, the rest are, or are in the process of being, added to the FB page!

Friday, March 1, 2013
More Puzzle Pieces!
A couple more puzzle piece pendants for you! I love these two, they're really cute and the best thing is that $5 from the sale of each will go to Alpine Autism Center, right here in the Springs.
 To find out more or purchase, email dragonglassusa@gmail.com, or come to the FB page to see these and several others!

Tuesday, February 26, 2013
Event...
Looks like I won't be doing the autism event after all. I decided to cancel my booth after discovering that the person organizing it had said she was donating to one cause and had changed her mind and was instead donating to another. The other cause however was not named, which, aside from being illegal (to solicit without naming your charity) is, in my opinion, totally unethical.
So, I will continue to make some puzzle piece items, but, will instead partner with a good local charity to donate a portion of the sales to. More to come...
So, I will continue to make some puzzle piece items, but, will instead partner with a good local charity to donate a portion of the sales to. More to come...
Monday, February 25, 2013
New Items!
To follow on from the Puzzle Piece Fusing post I recently did, I thought I would share some of the new pieces. There are more to come and more items that I want to grind and fire polish to make extra sparkly, but, here are some of the new items, that have been added to the Facebook page.
 I think the puzzle piece ones turned out nicely! I also really like the subtle one, it's not too 'in your face'.

Wednesday, February 20, 2013
Soldering (Almost) Finished!
 |
| It actually stands up under its own weight now... |
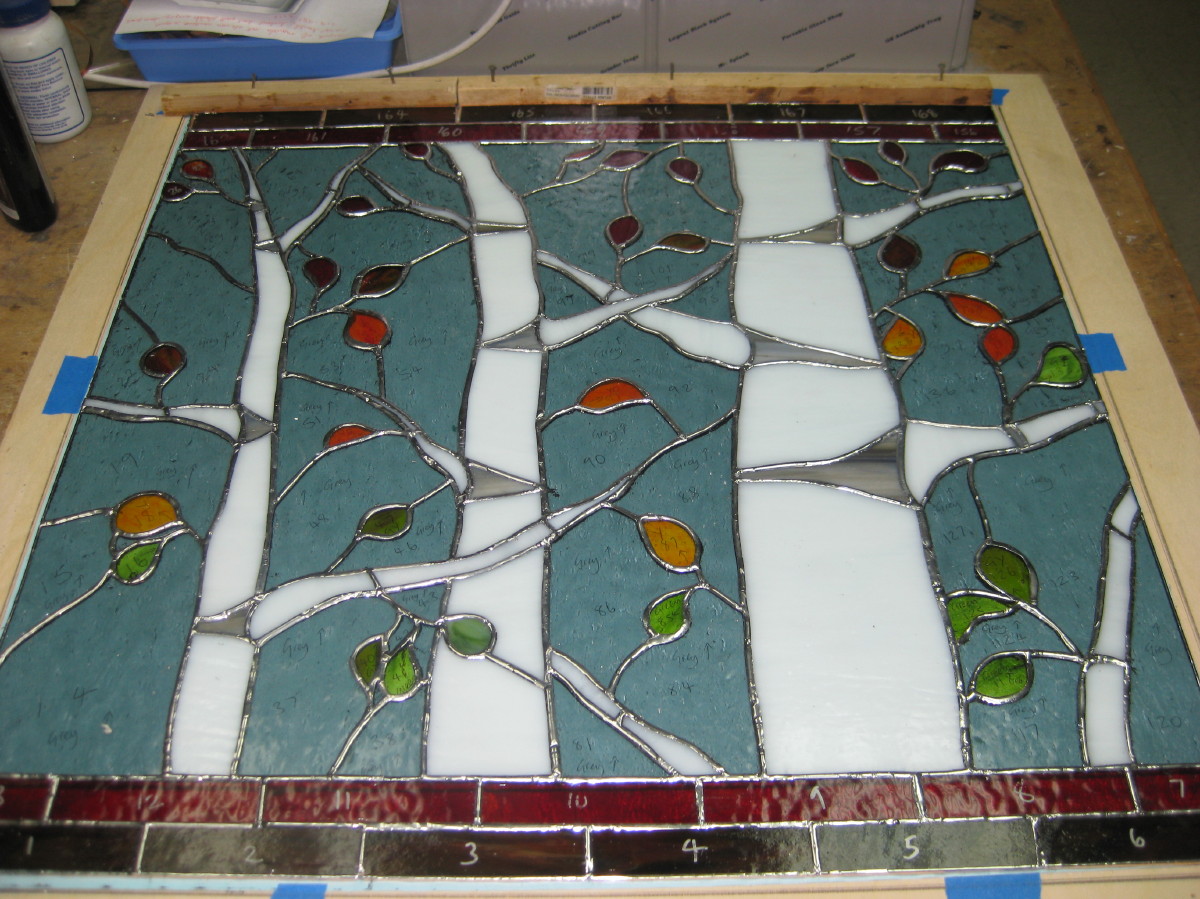
Today I finished off the last piece of soldering. I will still need to remove a couple of mushrooms (where the solder bleeds out of the other side of the piece) and get rid of the little spikes that you sometimes get.
So, all I need to do is finish that last bit, frame it in zinc and patina, then it's ready for sandwiching!
The glass will need to be sandwiched in tempered glass because it's going in a door and that's what building codes require, but, other than that, it's really close to going in!
After this piece, I have two more to do, since I also need to do the sidelights, but, I promise I won't bore everyone to quite the extent I did with this one!
Tuesday, February 19, 2013
Puzzle Piece Fusing
So, my friend Laura and I are going to be having a booth at a local autism event next month and I figured I should probably make some additional stock, especially since I've sold a few pieces lately.
The thing that inspired me to try glass fusing was a puzzle piece pendant I saw on a friend, so, given that the puzzle piece has become somewhat of a symbol of the autism community, I thought I would try and make a few puzzle-inspired items to sell.
I've seen a technique where an image is etched onto dichroic glass, leaving just the picture you actually want. It's achieved by choosing a design and making a mask for it. It can be something as simple as a leaf or an initial, or, in my case a puzzle piece. I took my glass fusing teacher's advice and managed to locate a craft punch in the correct shape. I punched out a piece of masking (today it was duck tape - it was all I had, but next time I'll find some better adhesive backed something) and set it on the glass. Then, I applied etching fluid, which, magically, removed the dichroic coating. Once cleaned and topped with a clear capper, it looked like this, below!
I also learned something - the dichroic glass pieces you get from Hobby Lobby don't etch well. I had a coupon so figured it was the cheapest way to try the etching fluid. It etched off the green layer, but not the gold, even after 2 applications. But, it did mask the green, so, I figured I would fire it just to see what it turns out like...
The thing that inspired me to try glass fusing was a puzzle piece pendant I saw on a friend, so, given that the puzzle piece has become somewhat of a symbol of the autism community, I thought I would try and make a few puzzle-inspired items to sell.
I've seen a technique where an image is etched onto dichroic glass, leaving just the picture you actually want. It's achieved by choosing a design and making a mask for it. It can be something as simple as a leaf or an initial, or, in my case a puzzle piece. I took my glass fusing teacher's advice and managed to locate a craft punch in the correct shape. I punched out a piece of masking (today it was duck tape - it was all I had, but next time I'll find some better adhesive backed something) and set it on the glass. Then, I applied etching fluid, which, magically, removed the dichroic coating. Once cleaned and topped with a clear capper, it looked like this, below!
 |
| Left side - etched puzzle piece, middle is a collage of dichroic bits and the right side is a piece of dichroic that was only etched slightly - we'll see how that one turns out) |
Sunday, February 17, 2013
More Soldering!
 |
| Side 1 soldering complete. |
Today brought the completion of the soldering on the one side of the panel, the big turnover, pattern removal and the start of soldering on the reverse side.
 |
| Reverse side soldering started |
Saturday, February 16, 2013
Latest Door Progress
I've been working on the piece for 3 days this week, but kept forgetting my camera, so, you're only getting pics today!
First news - I finally finished foiling and grinding. That's a huge relief! Here is the pic of the foiled piece. The tape and pins you see are to keep the 'strong line' reinforcement in place and also to keep things in place, since the strong line tends to act like a spring.
The next pic is after today's soldering! I've secured most of the piece now, but, especially the areas with the strong line, so, I was able to remove the tape and pins. Just soldering to finish (both sides), putting on a zinc frame and patina and then decide whether to sandwich it permanently between two panes with silicone, or to just butt it and silcone up next... We will see on that front.
First news - I finally finished foiling and grinding. That's a huge relief! Here is the pic of the foiled piece. The tape and pins you see are to keep the 'strong line' reinforcement in place and also to keep things in place, since the strong line tends to act like a spring.
 |
| Foiling complete! |
The next pic is after today's soldering! I've secured most of the piece now, but, especially the areas with the strong line, so, I was able to remove the tape and pins. Just soldering to finish (both sides), putting on a zinc frame and patina and then decide whether to sandwich it permanently between two panes with silicone, or to just butt it and silcone up next... We will see on that front.
 |
| Start of soldering! |
Sunday, February 10, 2013
More Leaves!

I also brought the border pieces home with me to foil.
As for the colours, the background looks more blue than it actually is because the pattern was printed on blue paper, the only paper the Kinko's I went to had in the size I needed..
Saturday, February 9, 2013
Woohoo! We Have Leaves!

But, today, I was able to add the first of the leaves, which will progress in colour towards the top. So exciting to finally see a little colour!
Thursday, February 7, 2013
Another Day, Another Pic!

My goal is for the end of Saturday to bring an end to the fitting portion, so on Sunday I can move onto foiling.
Subscribe to:
Posts (Atom)